Friday 8 March 2013

Green Screen Keying - Iron Sky

Green screen allows for film makers to create films set in locations that they would not normally be able to get to or afford to make a complete set. 


The film Iron Sky, for the majority of the film, is set in a Nazi base on the moon. Because the film was fan funded, the filmmakers could not actually go to the moon. Nor could they build an extensive set.


In order to simulate weightlessness, falling actors made an extensive of wires to generate an exaggerated slow falling motion. Additionally only aspects to the set that were physically there, were those that the actors physically interacted with.
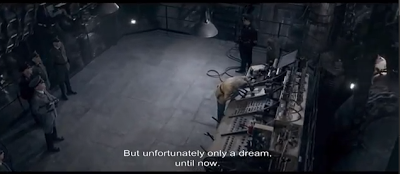


In this scene, the character is stood on a rotating platform and then struck from behind by a large mechanical machine. In order to achieve this, the actor was actually static and the camera followed his motion. To simulate his being struck, he was hit by a crew member dressed in a green morphsuit with a green bar, all of which would be keyed out in post-production.


This scene shows a platform in the engineering section of the base. Only the immediate platform that the actors stand on was constructed, whilst the rest of the set was green. The camera zooms in on the screen requiring motion tracking, but because the parts of the set that weren't green were actually part of the set, there was no need for a mask.


In my own film, I would be using a virtual set, and green screen techniques. However a low budget means that I cannot create any physical aspects to the set.

Generating the Beam

For the abduction of my photographer, I needed the spaceship to fire a laser beam at him. This would allow for a visual guide as to what's happening to the photographer.

The Beam effect was made by adding an effect to a solid object. I then had to decide the direction of the beam, as well as the thickness of the starting and ending points of the beam. I then had to key the direction of the beam as it was fired, allowing it to move across the screen.


Additional effects were a pre-emptive glow on the ship, giving the impression of the beam being charged up before firing, and a glow on the beam as it travelled, and then the teleportation effect after the actor is hit by the beam.

Compositing the space ship

No Alien Abduction scene would work without the alien UFO to abduct the unwilling victim. Unfortunately I didn't have any actual space ships lying around to abduct people with, so I had to construct one digitally in Maya and then digitally layer it into my video footage.


After the ship has been animated and rendered out of Maya, I can then take the footage into After Effects and layer the ship above the footage of the crowd.


However, the ship would not appear behind the building layer, in the foreground, despite it being behind it in the idea. This was fixed, as can be seen in the image below, by putting a duplicate layer of the crowd footage in front of the ship, then masking the building in the foreground so that it the ship's wing appears to be behind the building.


All that needed to be added later was some colour correction so that the ship meshed with the background much more naturally.

Green Screen and Virtual Sets

 For the interior of the ship, I needed to create a virtual set, and then using Green Screen, place my actors there virtually through the Keylight tool in after effects.

The Space Ship interior was a small section that I modelled in Maya. I used a dim directional light to give the scene the correct level of lighting.


The pictures above show the actors in front of the green screen, and after the screen has been keyed out and replaced with the virtual set. Unfortunately, the actors occasionally went off the green screen or overlapped with the tracking markers that could not be keyed out, this was fixed using a mask.


The green screen was keyed using a tool in After Effects called Keylight. This allows us to take the green segments of the footage and mask them out, as well as preventing slight green reflections on the actors being keyed out as well. There are also options that allow for the actors to mesh with the backplate much more naturally.


Unfortunately, there may be sections of the green screen do not key out correctly, or the actors may step off the green slighty. this can be fixed using a mask known as a Junk Matte. A Junk Matte is like a barrier you draw around the actors, anything outside of this barrier cannot be seen. However, when the actor on the footage moves, the mask needs to be animated to prevent the actor  stepping outside of the mask.

Colour Correction in virtual sets

Often, when working with Virtual sets, the actors may not be lit quite correctly with the background. They may be too bright, or the wrong colour for the set. To get around this, a process called colour correction is used, this allows us to make the actor sit visually against the backdrop much more realistically, giving the illusion that they are actually there.

By using a tint effect, I was able to lower the lighting levels on the actor. By matching the darkest and lightest tones in the backplate, the actor started to appear to fit against the backplate. This was then further corrected by altering the colour levels on the actor, slightly raising the blacks and lowering the whites to further match the blackplate.

As you can see by the pictures above, the picture to the left shows the actor without colour corrections, the picture on the right showing colour correction. The actor matches the lighting of the backplate a lot more realistically on the right, fitting the grungy, dim feel of the spacecraft.

Teleportation effects

To complete the abduction sequence, the actor needed to teleport. For this we needed a beam up and a beam in effect in the two locations the teleport was to take place.


A simple fade effect starts the teleport sequence. By simply key-framing the opacity of the actor, I was able to create a smooth disappearing and appearing effect. However, the fade looked too simple, and it wasn't completely obvious that it was a teleportation effect.


Because the fading effect was not substantial enough for the teleport, I needed to create a glow effect, similar to the beaming effect used in many sci-fi works such as Star Trek. To create this effect I simply added an elipse that was the correct colour, and gave it a feathered effect, that would expand and retract as the victim was teleported.


The final result was a blue light that would engulf and release the photographer as they were absorbed by the beam and teleported onto the storage deck of the space ship.